


Table of Contents
ToggleIf you’ve ever missed a delivery, been startled by unexpected visitors, or wanted to know when someone’s on your property, a driveway alarm solves that problem quietly and efficiently. Dakota Alert has built a reputation for wireless motion detection systems that don’t require Wi-Fi, monthly fees, or complicated wiring. These systems use passive infrared (PIR) or magnetic vehicle sensors paired with wireless receivers that alert homeowners the moment something crosses the detection zone. Whether you’re monitoring a long rural driveway or securing a suburban lot, Dakota Alert offers reliable, DIY-friendly options that work in all weather conditions.
Key Takeaways
- A Dakota Alert driveway alarm uses wireless motion detection sensors (PIR or magnetic probes) to alert you when vehicles, people, or motion crosses your property without requiring Wi-Fi, subscriptions, or complicated wiring.
- Dakota Alert systems operate independently with a 1,000–4,000 foot wireless range, making them ideal for rural properties where internet access is unreliable or unavailable.
- Installation is DIY-friendly and straightforward: PIR sensors mount on posts or trees at chest height, while magnetic probes require shallow trenching 2–4 inches below the driveway surface.
- Popular Dakota Alert models like the DCPA-2500 and DCRP-2500 offer expandable monitoring across multiple zones with customizable alert tones, allowing you to distinguish between front driveway, side gates, and back access roads.
- Maximize performance by mounting the receiver high and in a window, using fresh lithium batteries, testing before permanent installation, and angling PIR sensors for cross-traffic detection rather than head-on approach.
- No monthly fees or contracts apply—once purchased, Dakota Alert hardware operates indefinitely on battery power, making it a cost-effective alternative to cellular or cloud-based security systems.
What Is a Dakota Alert Driveway Alarm and How Does It Work?
A Dakota Alert driveway alarm is a wireless detection system that monitors movement along driveways, pathways, or property perimeters. Unlike security cameras or wired systems, these alarms use battery-powered sensors that communicate with a base station receiver inside your home. The system alerts you with a chime, tone, or voice announcement when motion is detected.
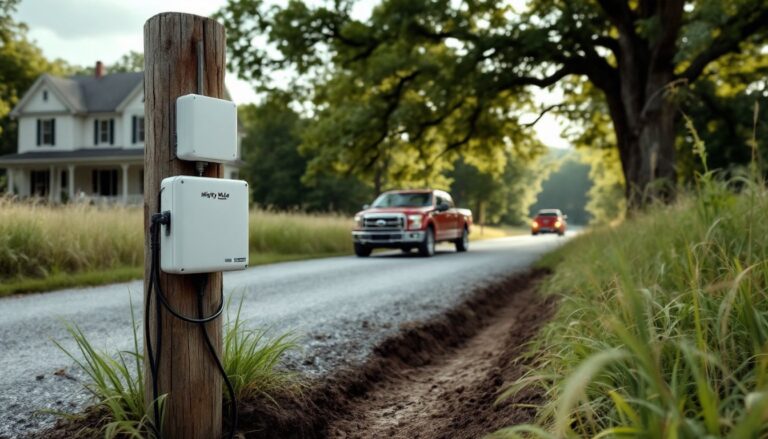
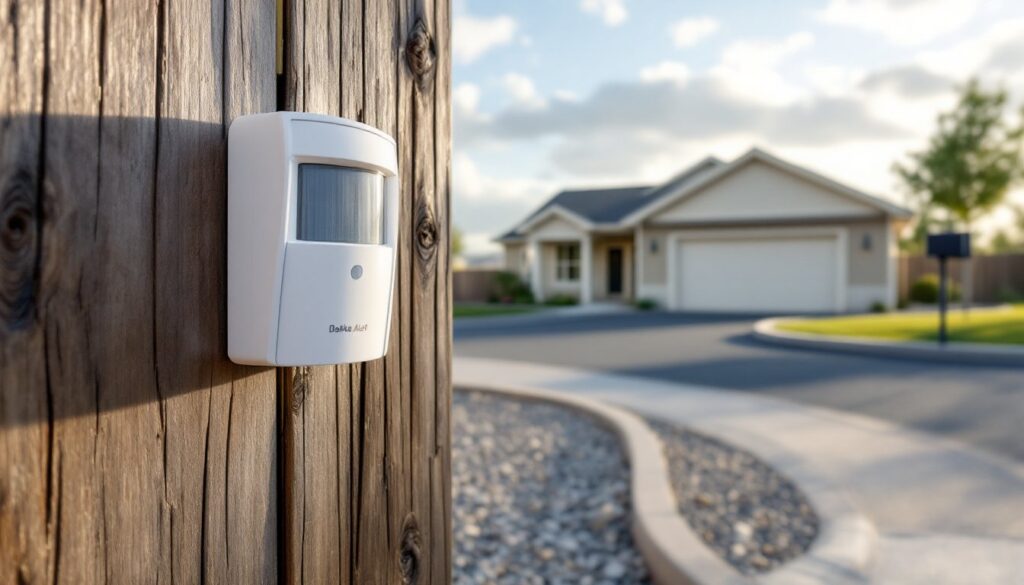
Dakota Alert primarily uses two sensor types: passive infrared (PIR) sensors detect heat signatures from people, animals, or vehicles, while probe-style magnetic sensors detect the metallic mass of vehicles passing overhead when buried in a driveway. PIR sensors work best for general property monitoring, while magnetic probes are ideal for long driveways where you only want vehicle alerts, not false alarms from deer or dogs.
The wireless transmission range typically extends 1,000 to 2,500 feet line-of-sight, though obstacles like hills, buildings, and dense foliage reduce effective range. Most Dakota systems operate on the 2.4 GHz or 915 MHz frequency band, with some offering adjustable power settings for extended range. The receiver plugs into a standard 120V outlet and can pair with multiple sensors across your property, each programmed with a unique tone so you know which zone triggered the alert.
Installation doesn’t require permits or licensed work, it’s purely a monitoring system with no structural modifications. Power comes from standard AA or D-cell batteries in the sensors, with most units running 6–12 months on a single set depending on traffic volume.
Key Benefits of Installing a Dakota Alert System
No monthly fees or subscription services. Unlike cellular or cloud-based security systems, Dakota Alerts operate entirely on wireless radio communication. Buy the hardware once, and you’re done. No contracts, no app fees, no cloud storage charges.
Works without Wi-Fi or cellular signal. This is critical for rural properties where internet access is limited or unreliable. The system functions independently, making it a solid choice for off-grid cabins, farms, or remote construction sites.
Expandable and customizable. Start with one sensor and add more as needed. Most Dakota receivers support up to four zones, and you can assign different alert tones to each sensor, helpful when you want to distinguish between front driveway, side gate, or back access road.
All-weather durability. Dakota Alert sensors are rated for outdoor use with weatherproof housings that handle rain, snow, and temperature swings from -30°F to 120°F. PIR sensors are housed in rugged plastic enclosures, and magnetic probes are sealed in epoxy for underground burial.
DIY-friendly installation. No drilling through walls or running low-voltage wire. Mount PIR sensors to trees, posts, or fence rails with included brackets. Magnetic probes require a shallow trench across the driveway, but the process is straightforward with a flat spade and a few hours of work.
Reduces surprise visits and improves security awareness. Whether it’s delivery drivers, trespassers, or wildlife, you’ll know when something’s approaching before it reaches your door. Useful for homeowners who work in back shops or have poor visibility from the house to the road.
Top Dakota Alert Driveway Alarm Models Compared
When evaluating options, reviews and comparisons of top driveway alarm systems often highlight Dakota’s range and reliability. Here’s a breakdown of popular models.
DCPA-2500 / DCPA-4000 (Probe-Style Vehicle Sensor)
These magnetic probe sensors detect vehicles only, minimizing false alarms from foot traffic or animals. The DCPA-2500 offers a 2,500-foot range, while the DCPA-4000 extends to 4,000 feet with an upgraded transmitter. Installation involves burying the probe 2–4 inches below the driveway surface in a shallow trench. Best for long driveways where vehicle-only detection is preferred. Requires a flat spade, PVC conduit for wire protection, and about 2–3 hours of labor.
DCRP-2500 / DCRP-4000 (PIR Motion Sensor)
Uses passive infrared to detect heat signatures from vehicles, people, and large animals. The DCRP-2500 covers 2,500 feet, and the DCRP-4000 pushes to 4,000 feet. Mount on a post, tree, or building at chest height, angled across the detection zone. Ideal for mixed-use areas, gates, side yards, or short driveways. Runs on four D-cell batteries and includes adjustable sensitivity to reduce false triggers.
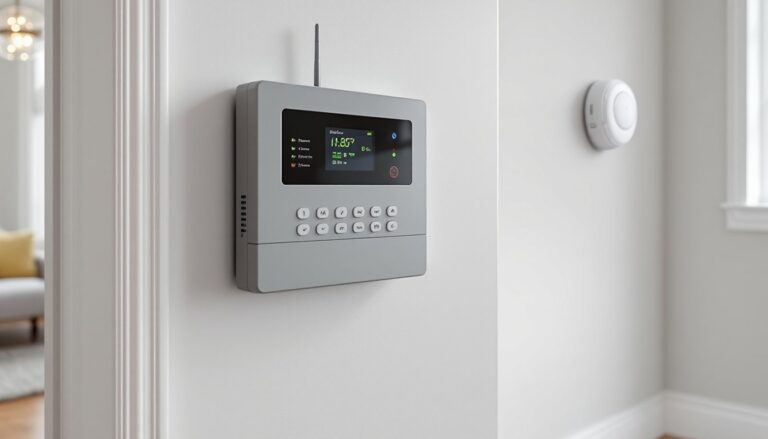
WR-3000 Wireless Receiver
The base station that receives signals from up to four sensors. Features include four adjustable tone zones, volume control, and a mute option for times when you don’t need alerts. Plugs into any standard outlet. Can be paired with both PIR and probe sensors simultaneously, giving flexibility across multiple property zones.
CRS Wireless Repeater
If your property exceeds the standard transmission range, the CRS repeater extends the signal another 1,000 feet or more. Useful for properties with hills, metal buildings, or dense tree cover that blocks line-of-sight transmission. Requires AC power or solar panel accessory.
Step-by-Step Installation Guide for Your Dakota Alert
Tools and Materials Needed:
- Cordless drill (for mounting PIR sensors)
- Flat spade or trenching tool (for probe sensors)
- 2×4 or fence post for PIR mounting (if no existing structure)
- PVC conduit or direct-burial wire sheath (for probe wire protection)
- Level
- AA or D-cell batteries (depending on sensor model)
- Zip ties or mounting brackets (included with most kits)
Installing a PIR Motion Sensor:
-
Choose the mounting location. Position the sensor 3–5 feet off the ground, facing across the driveway or pathway, not straight down it. Detection works best when motion crosses the sensor’s field of view rather than approaching head-on. Avoid aiming directly at sunlit surfaces or heat sources like AC units.
-
Mount the bracket. Use the included screws to attach the bracket to a post, tree, or wall. If mounting to a tree, use stainless steel or galvanized screws to prevent rust. Ensure the sensor is level using a bubble level.
-
Insert batteries and test. Load batteries into the sensor, close the housing, and walk through the detection zone. The sensor should trigger the receiver inside your home with the programmed tone. Adjust sensitivity if needed using the dial inside the sensor housing.
-
Secure wiring and housing. Tuck any exposed antenna or mounting hardware neatly. Use zip ties to manage excess wire.
Installing a Magnetic Probe Sensor:
-
Mark the installation spot. The probe should be buried 2–4 inches deep, centered in the driveway where vehicles will pass directly over it. For two-lane driveways, consider two probes or position one probe where most traffic crosses.
-
Dig the trench. Use a flat spade to cut a narrow trench across the width of the driveway. The trench only needs to be wide enough for the probe and wire, typically 1–2 inches.
-
Lay the probe and wire. Place the probe in the trench, then run the wire back to the transmitter box location (usually mounted on a nearby post or building). Protect the wire with PVC conduit or direct-burial sheathing to prevent damage from gravel shifting or freeze/thaw cycles.
-
Backfill and compact. Cover the trench with soil or gravel and tamp it down firmly. Avoid leaving loose fill that will settle and create ruts.
-
Connect and test. Wire the probe to the transmitter per the included instructions, insert batteries, and drive a vehicle over the probe. The receiver should chime. Adjust transmitter settings if the signal is weak.
Safety Note: Always call 811 or your local utility locator service before digging to avoid buried electric, gas, or water lines. Even shallow trenches can intersect service laterals.
Troubleshooting Common Dakota Alert Issues
Receiver isn’t chiming when sensor is triggered.
Check battery levels first, weak batteries reduce transmission range. Verify the receiver and sensor are paired correctly by following the sync instructions in the manual (usually involves pressing a button sequence). Ensure line-of-sight isn’t obstructed by metal buildings, dense foliage, or terrain. If range is the issue, add a repeater or relocate the receiver closer to the sensor.
Frequent false alarms with PIR sensors.
PIR sensors detect heat, so direct sunlight, reflective surfaces, or heat vents can trigger false positives. Adjust the sensor’s aim to avoid these areas. Lower the sensitivity setting using the dial inside the housing. Trim vegetation that might blow across the detection zone in wind. If wildlife is the issue and you only want vehicle alerts, switch to a magnetic probe sensor.
Probe sensor not detecting vehicles.
Confirm the probe is buried at the correct depth, too deep and it won’t sense the vehicle’s metal mass: too shallow and it may get damaged. Check that the wire connections between probe and transmitter are secure and not corroded. Test with different vehicle types: small motorcycles or bicycles may not trigger magnetic sensors reliably.
Weak signal or intermittent alerts.
Metal roofs, concrete walls, and hilly terrain all reduce wireless range. Relocate the receiver to a window facing the sensor or mount it higher. Use a wireless repeater to bridge the gap. For smart home technology integrations, ensure compatibility with any third-party systems.
Batteries draining faster than expected.
High-traffic areas trigger sensors more frequently, reducing battery life. Cold weather also shortens battery performance. Switch to lithium batteries for better cold-weather endurance. Consider solar panel accessories for remote sensors that are difficult to access.
Maximizing Range and Performance: Expert Tips
Mount the receiver as high as practical. Signal propagation improves with elevation. If your receiver is in a basement, move it to the main floor or near a window.
Use fresh, high-quality batteries. Cheap alkaline batteries fail faster in temperature extremes. Lithium batteries cost more upfront but last significantly longer, especially in sub-freezing conditions.
Test before permanent installation. Set up the sensor and receiver temporarily, then walk or drive the detection zone several times over a few days. This helps you identify false triggers and weak signal areas before committing to mounting hardware or trenching.
Angle PIR sensors for cross-traffic, not approach. Detection range drops when a person or vehicle moves directly toward the sensor. Mounting at a 45-degree angle to the path of travel improves reliability.
Add a repeater for properties over two acres. Line-of-sight range specs assume flat, open terrain. Real-world conditions often cut effective range by 30–50%. A repeater is cheaper and easier than relocating sensors or running extension wire.
Program different tones for each zone. If you’re monitoring front driveway, side gate, and back access, assign each sensor a unique chime pattern. This way, you know immediately which area needs attention without checking a screen or app.
Check and clean sensor lenses annually. Dust, pollen, and spider webs reduce PIR sensor effectiveness. Wipe the lens with a soft cloth once a year. Inspect mounting brackets for rust or loosening.
Consider solar upgrades for remote sensors. Dakota offers solar panel kits that trickle-charge internal batteries, eliminating the need for manual battery swaps on hard-to-reach sensors.
For professional advice on property security systems or installation, hiring a qualified contractor can ensure code compliance and optimal placement, especially for larger estates or commercial properties.
Conclusion
Dakota Alert driveway alarms deliver reliable, wireless property monitoring without subscriptions or complex wiring. Whether you choose a magnetic probe for vehicle-only detection or a PIR sensor for broader coverage, installation is straightforward for most DIYers. Focus on proper sensor placement, fresh batteries, and line-of-sight clearance to maximize performance. With the right model and setup, you’ll have early warning of arrivals, improved security awareness, and fewer surprises at your front door.